

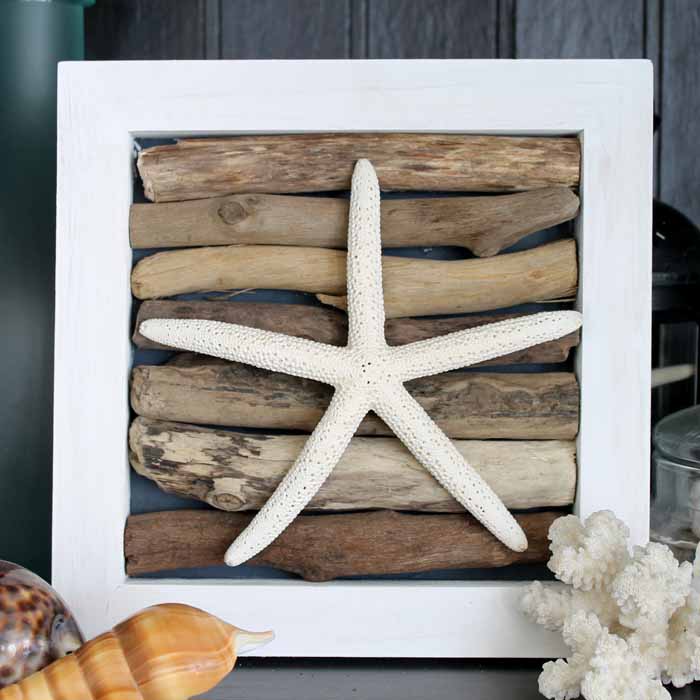
If you love beach decor, you’re going to want to make this starfish craft! It’s simple, easy, and gorgeous. Learn how to make your own in just minutes.
Beach decor is one of my favorite types of decor! I can’t get to the beach as often as I would like. That’s why I love anything that reminds me of the sun, sand, and surf when I can’t be there in person.
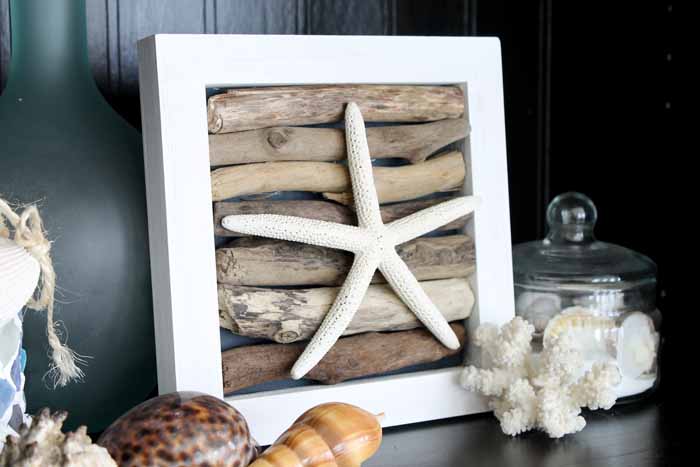
Today’s DIY starfish craft makes super easy beach wall art that looks like you spent way more time on it than you actually did! Grab a few supplies and make your own version today.
How To Make Starfish Craft
Prepare to be amazed! I love the simplicity of this craft. It’s deceptively simple and yet looks incredible. It gives the perfect beach vibe that every beach fan needs. Just follow these simple steps, and your own art piece will be ready quickly!
NOTE: If you love the beach as much as I do, in addition to this craft, be sure to check out more of my beach-themed crafts, including Beach in a Bottle Keepsake, Driftwood Wall Art: Beach Home Decor, and Easy DIY Monogram Sea Glass Art.
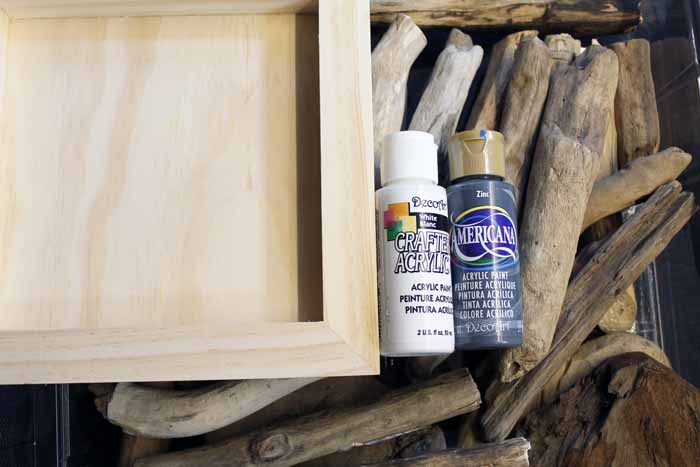
Supplies Needed To Make Starfish Craft
If you are headed to the beach this summer, it’s the perfect time to comb the beach for driftwood to make this project extra special.
No beach trip this summer? No problem! I have a way for you to make it below by ordering what you need online.
- Driftwood (if you don’t have any from the beach, you can buy some great pieces here)
- Starfish
- Wood panel with a recessed back (I used the 8×8 version)
- Hot glue and glue gun
- Saw
- White craft paint
- Gray craft paint
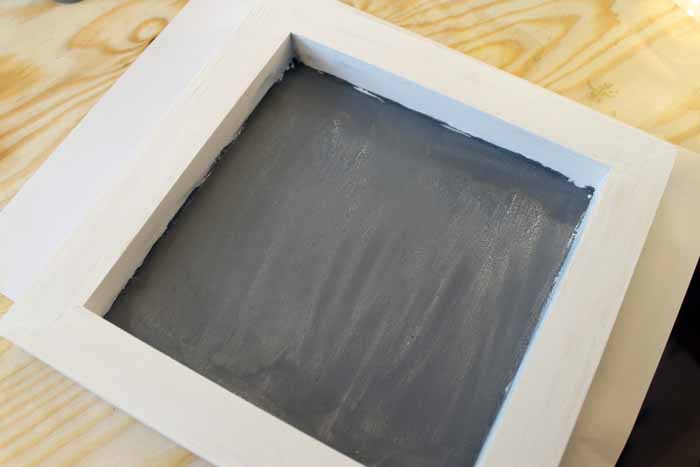
Step 1: Paint Wood Panel
Start by painting the wood panel. I used a dark grey on the very back and white for the sides, as shown below. Remember that most of this will be covered by the driftwood, so I was not too concerned about my paint lines. Allow that to dry completely.
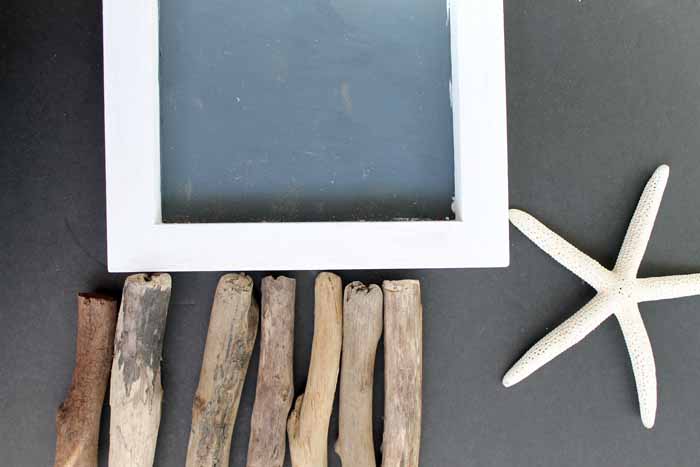
Step 2: Cut Driftwood
Use a saw to cut the driftwood to the same size as your recessed opening. I personally love my Rockwell Bladerunner for projects like this one!
I recommend approaching this part of the project like a puzzle. Fit the pieces together until you like the look. Don’t forget that the gray paint on the back of your recessed frame will be all that shows through any gaps. Because of that, you don’t need to worry too much about filling in all the gaps.
I happen to think that seeing a little of the gray background adds to the overall effect of the wall art.
Step 3: Glue Driftwood & Star To Wood Panel
Use hot glue to secure the pieces of driftwood to the inside of your wood panel. Then, use hot glue to add the starfish to the front of the driftwood portion of the project. Allow the hot glue to dry completely.
Your starfish craft is complete and ready for hanging! I just love how it turned out.
Where will you add this beach wall art in your home? Display it on your mantle or shelf, or hang it on your wall. It’ll look stunning anywhere!
You will love the look of this fun starfish craft but even more than that, you’ll love just how easy it is to make. You will have your own beach decor in just minutes!
FAQs About Starfish Craft
Here are a few common questions that I often see readers asking about making this starfish craft. If you have a question, please check if I’ve already addressed it below. If you don’t see your question listed, please leave it in the comments!
Can I Adjust The Size Of This Starfish Craft?
Yes, you can! However, if you make this starfish craft bigger, you will need a larger wood plaque and more driftwood pieces.
Where Can I Buy Driftwood?
You can buy driftwood pieces online, at your local craft store, or even on Facebook marketplace.
Can I Change The Color Of The Driftwood?
Absolutely! You can buy driftwood in different colors or even paint it if you want a specific color.
Can I Use A Different Type Of Glue?
You can, but hot glue is the best for this craft because it has a strong hold and dries fast. However, if you want to skip the hot glue, you can use industrial-strength glue, tacky glue, or super glue instead.
5 More Beach-Themed Projects
Did you love this starfish craft and are now looking for more beach crafts to make? Then, check out the projects below!
- Starfish Wreath
- Sand Cast Starfish
- Beach Shadowbox Art
- Beachy Mason Jars (with Coastal Texture Paint)
- Nautical Decor Using Rope


I love this beach style. This looks wonderful.
This is so elegant! It looks easy enough to make, but has to start with a doze of vision:). Thank you for sharing the steps to making such a cure starfish decor piece.
This is so pretty!
I would love for you to share this with my Facebook Group for recipes, crafts, tips, and tricks: https://www.facebook.com/groups/pluckyrecipescraftstips/
Thanks for joining Cooking and Crafting with J & J!
Thank you for that wonderful craft idea. Love it! I am an artist too! 🙂
I found you on the link up. This is adorable. I have sooooo much driftwood in the studio. You gave me an idea for a class. Thanks.
This little project turned out so cute, it would be a perfect addition to my bathroom!!
Thanks for sharing on the #OMHGWW last week!!
Wishing you a great week ahead!
Hugs
Karren
Hi! I’m one of the co-hosts from the Welcome Home Wednesday Linky Party. I love your Starfish Craft. It’s too cute. My husband and I got married on the beach so I have some starfish decorations that were left over. I really need to make this! Thank you for sharing.
This is so very cool. I love it! Sharing on Fb!Thank you for sharing on Merry Monday! Have a great week!
Kim
Loved this starfish creation so much I have featured it on Create, Inspire, Love…
I will definitely be making one!
http://miabellapassion.blogspot.co.nz/2017/06/create-inspire-love-28.html
What a cute craft! It makes me wish I didn’t live so very very far from the beach!