

Jen Goode is back this month with handmade fairy houses! This includes a free printable fairy garden coloring page that you can use for a variety of projects!
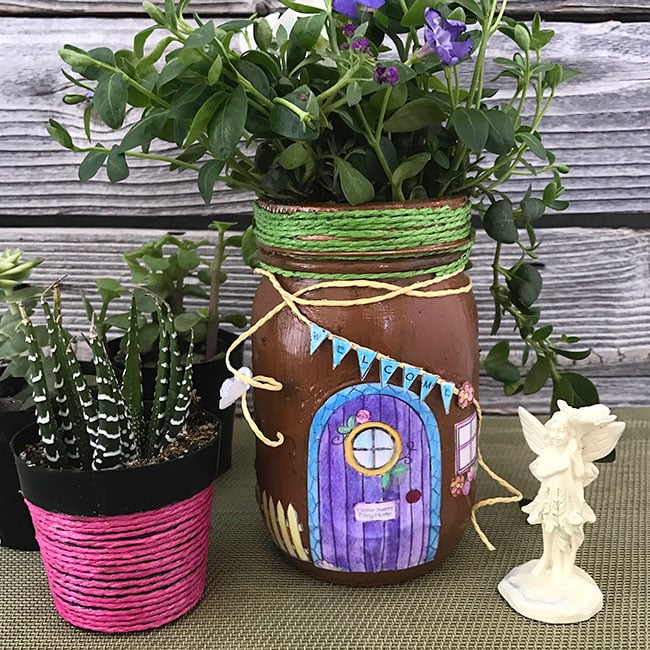
Make your own adorable mason jar fairy house using free printables and coloring pages. You can customize your fairy house with your own favorite colors and design ideas just by using printable art. Color it however you’d like and add your own personal touch! I’ve created a free coloring page you can use, and today, I’m showing you how to make your own fairy house using a standard mason jar. Let’s get crafty!
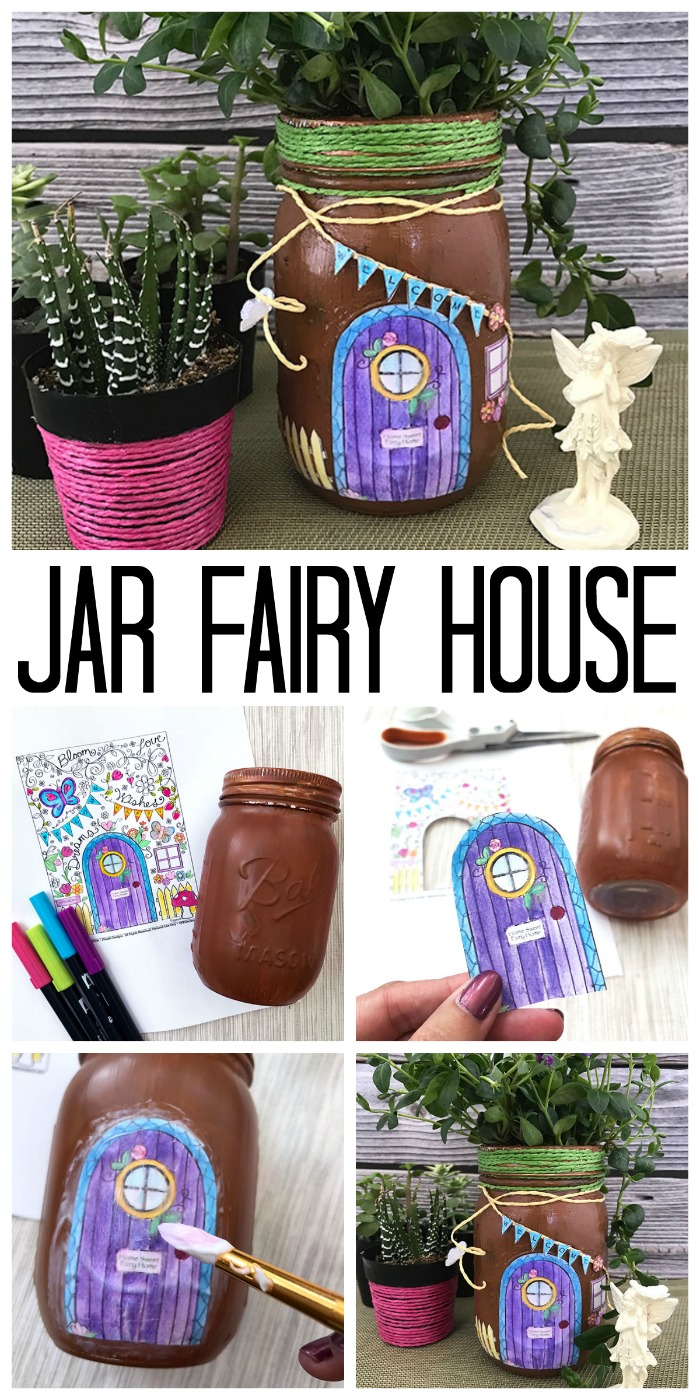
How To Make Handmade Fairy Houses
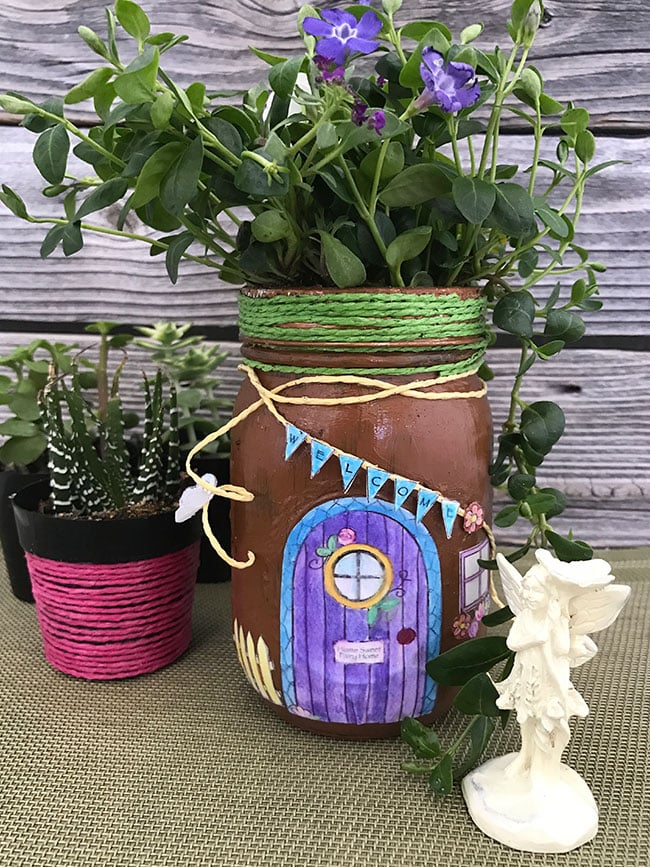
You can paint your jar or leave it clear and add something inside. For my own fairy house, I wanted to grow a plant in the jar, so I painted the jar a light coat of brown. Multi-purpose paints seem to work best, especially if you plan to put your fairy house outside.
Supplies Needed To Make Handmade Fairy Houses
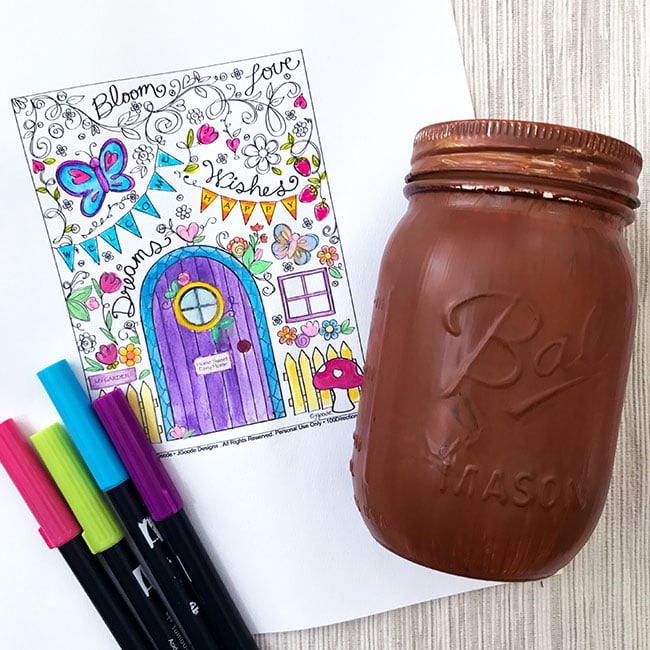
- Printable fairy garden coloring page by Jen Goode
- Coloring supplies
- Quart size Mason Jar
- Brown craft Paint (optional)
- Outdoor Mod Podge
- Paint brushes
- Small plants and flowers and potting soil, if needed
- Scissors
Step 1: Paint Mason Jar
Paint the mason jar and allow to dry. I covered my jar with just a single coat of paint because I knew I would be filling the jar with planting soil. You can apply as many coats and colors of paint as you’d like.
Step 2: Print, Color & Cut Fairy Garden Coloring Page
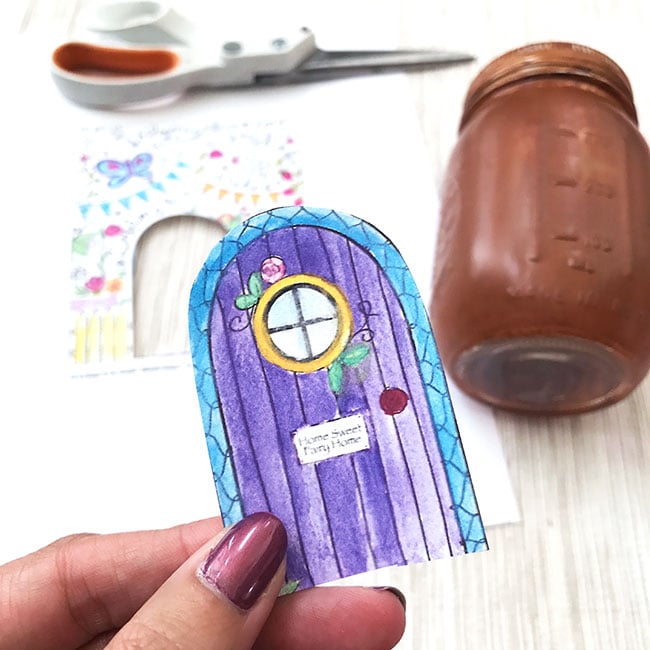
Print and color the coloring page however you’d like. Cut out the pieces you’d like to use for your fairy house. I printed the art at 50% to shrink it to fit this specific jar project. You can resize the page to fit whatever size project you are working on.
Step 3: Add Coloring Page Art To Mason Jar
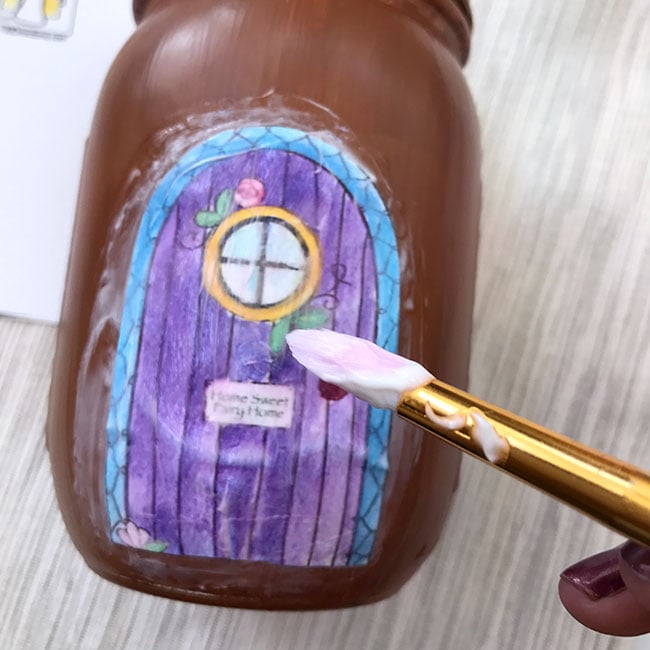
Decoupage the coloring page art to the jar. Using a paint brush, apply Mod Podge to the jar where you’d like to place your colored cut outs. The Mod Podge dries pretty quickly, so only apply it in the area you are working on for each individual piece. Place the paper on the wet Mod Podge, press into place, and then cover with additional Mod Podge. Repeat for each piece you’d like to add to your jar.

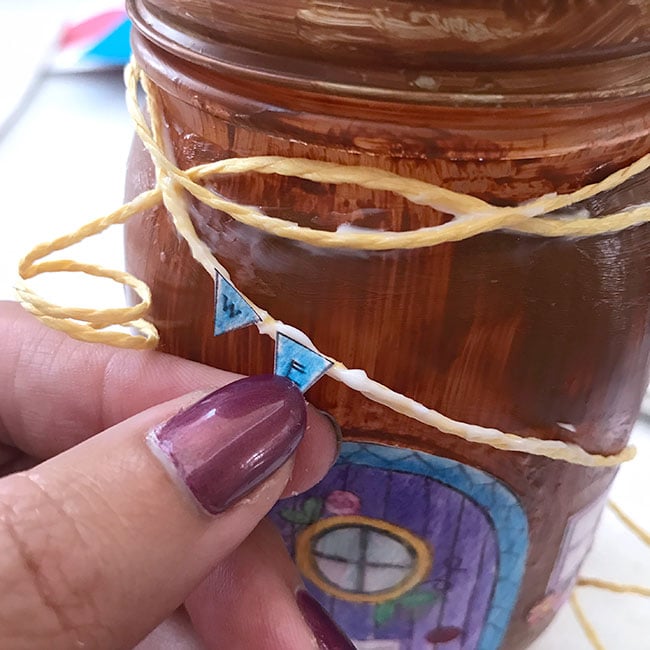
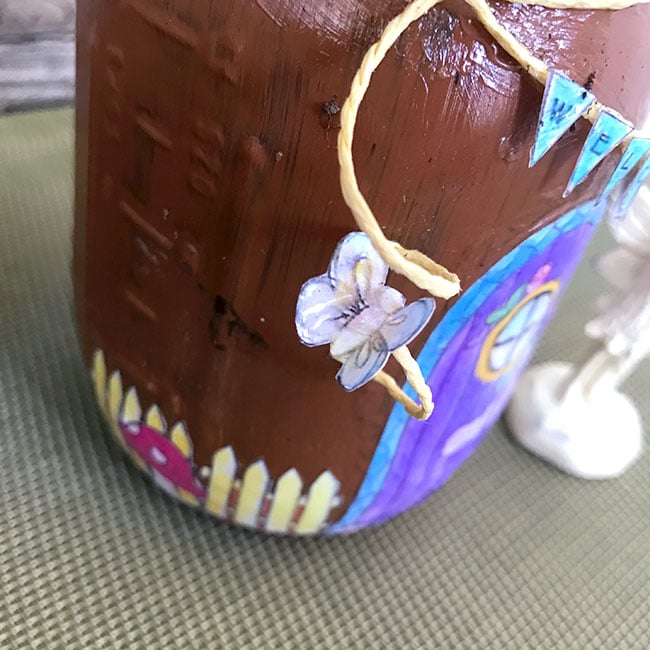
Step 4: Add Additional Accessories
If you have additional accessories you’d like to include on your fairy house, the Mod Podge should adhere them. I wrapped twine around the top of my jar and added some fun little curling pieces that hang down the jar. I used Mod Podge to adhere the twine both at the top and to keep the little curls in place.
Step 5: Seal Mason Jar With Mod Podge
If you’d like, apply additional Mod Podge to the jar to even the shine around the jar. The Mod Podge can be a bit shinier than the paint, so you can use the Mod Podge as a sealer to add that extra finished look. This will also help weatherproof the art a bit for outside use.
Allow everything to dry.
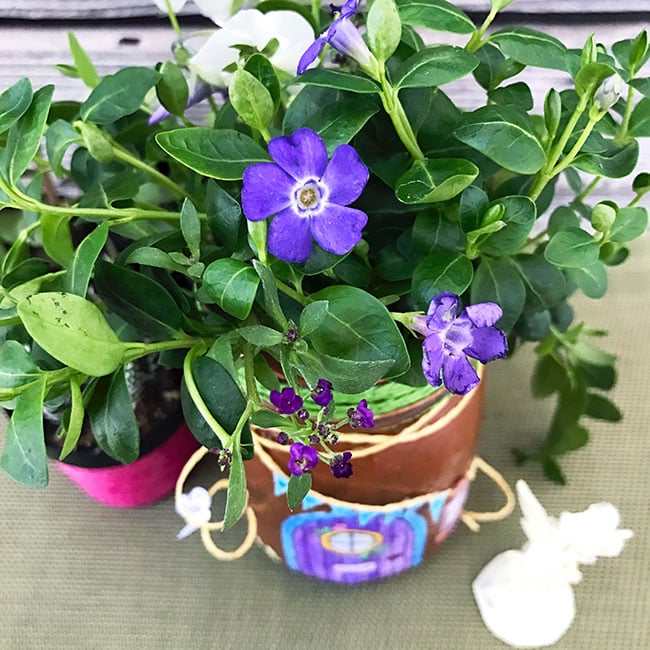
Step 6: Add Plant (Optional)
Add soil and the small plants to your jar to finish the look of your fairy house. You can also use this little jar fairy house as a vase for flowers that you can change as the seasons change.
Have fun making your fairy house! You can create a whole village of cute fairy houses. Just color the designs differently and add different accessories to make each house unique. I can’t wait to see how yours turn out! Make your own handmade fairy houses today!
FAQs About Handmade Fairy Houses
Here are a few common questions that I often see readers asking about making these handmade fairy houses. If you have a question, please check if I’ve already addressed it below. If you don’t see your question listed, please leave it in the comments!
Where Can I Get The Fairy Garden Coloring Page For This Project?
You can get the free fairy garden coloring page by clicking here!
Can I Adjust The Size Of The Mason Jars?
Yes, you can! For this project, you can use any size mason jar. The only thing to remember is that you may need to adjust the size of the fairy garden coloring page to fit your mason jar.
Can I Use A Different Type Of Glue For These Handmade Fairy Houses?
I found that Mod Podge works best for this project. If you don’t have Mod Podge, you could use another type of decoupage glue or even a mixture of white glue and water.
What Else Can I Put In These Handmade Fairy Houses?
If you don’t want to put a live plant in the mason jar, you can add fake flowers or a succulent. You could also use the mason jar for storage and store markers, colored pencils, etc.
5 More Fairy Crafts
If you love these handmade fairy houses, here are some other fairy crafts that you won’t want to miss!
- Fairy Garden Terrarium
- How to Start a Fairy Garden
- Fairy Cricut Nightlight In A Mason Jar
- 15 Minute Dollar Store Fairy Garden Pedestal
- Fairy House Mason Jar


I love Fairy Gardens and I am a fan of Jen Goode’s work. To have them both together is awesome, amazing and soooo cute. I am in love with this idea and I am going to get busy and make mine ASAP! Thank you for this cute project.
I love this project! So cute. Pinning.
Oh my god Angie this is so cute!! There’s a LOT of ways to use mason jars, but making a fairy house was not on my radar yet 🙂 Thank you for sharing at the Friday Favorites linky party!
*Maisy
Adorable! As if I couldn’t love mason jars more. lol
That is so cute!!
Did you get my imagination instead of me? This fairy house/planter is absolutely phenomenal, love, love, it. Have to forward this to my daughter who has been making/loving fairy stuff for years. As soon as I saw this on the party posts had to tell her about it. So doggoned clever and perfect. Love these linky parties.
Have wonderful weekend Angie
So cute and such a simple idea, I might just try this with some of the children staying here with us on holiday. They love our big fairy garden so this would be perfect for one of our craft sessions #InspireMeMonday
So cute for a fairy garden! Love that painted, Mod Podging your drawings and the plants out the top!
Hello! This is so adorable! i featured this post on my blog today at Vintage Mama’s Cottage here: http://vintagemamascottage.com/2017/05/04/favorite-things-spring-inspiration/ for this week’s Favorite Things Linky Party. I hope you’ll stop by for a visit at Vintage Mama’s Cottage and check out the other posts that are featured this week. I’ll be looking to see what you share this week at the Favorite Things Linky Party! I would also like to share this in our craft group on the RUBY community website here: http://www.rubyforwomen.spruz.com
Of course I will link back here and let our members know where they can find more fun DIY projects for their homes and families. Thanks so much for sharing at the linky party. Nina @ Vintage Mama’s Cottage