
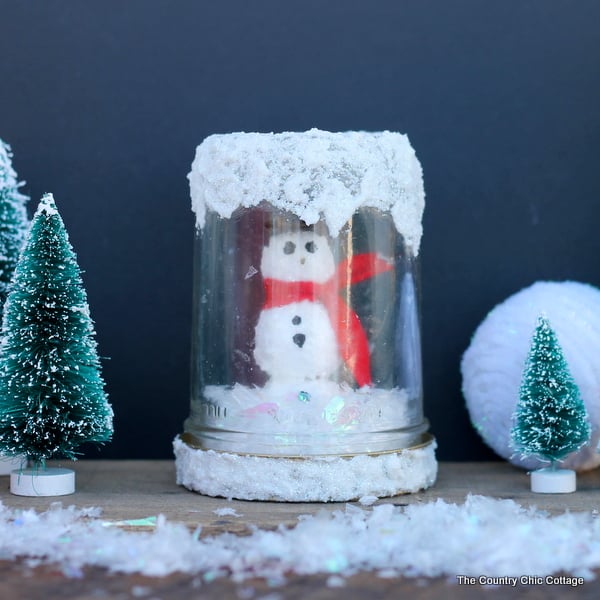
Snow globes delight the child in all of us! You can proudly display and enjoy a variety of snow globes throughout the year, but they make an especially festive addition to your holiday decor. Learn how to make a unique DIY mason jar snow globe to add to your holiday decorations!
How To Make Mason Jar Snow Globe
Although I love snow globes, my love for them pales compared to how much my kids love them! We used to buy snow globes, but one day, I decided to try making them. I’m so glad I did because they’re easy to make.
If you know me, you know that I love mason jars and use them anytime I can because they’re affordable and versatile. Mason jars are the perfect container for DIY snow globes like these kid-friendly, waterless snow globes!
I couldn’t resist adding another fun DIY mason jar snow globe (with a snowman inside!) to my list of crafts. You can make the small DIY snowman in just a few simple steps, then add him to a snowy wonderland for a unique and lovely snow globe that will receive rave reviews.
NOTE: If you love holiday crafting, be sure to also check out my Cute Snowman With The Cricut Maker, DIY Christmas Mugs, and DIY Holiday Gift Bags.
Supplies Needed To Make Mason Jar Snow Globe
- Ball Mason Jars Wide Mouth Pints
- Foam balls (in three sizes)
- Toothpicks
- Hot glue
- Glistening Snow-Tex
- Red felt
- Black craft paint
- Brad in yellow or orange
- Black buttons of various sizes
- Loose iridescent snow
NOTE: This project will take a bit of time to complete because of long dry times, so plan ahead.
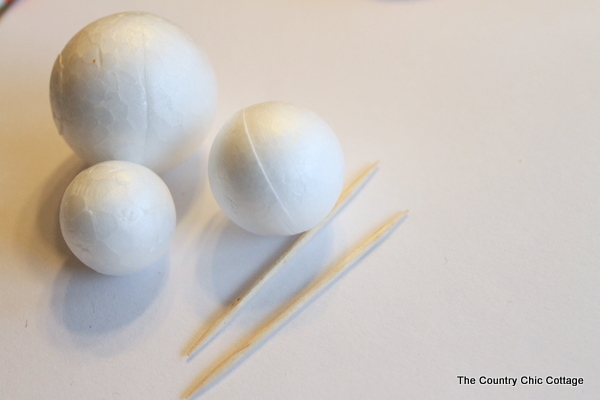
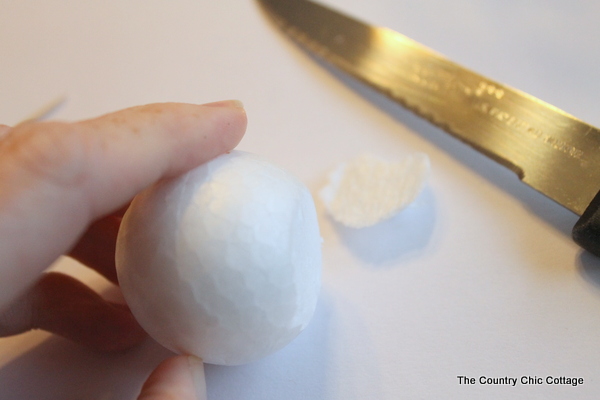
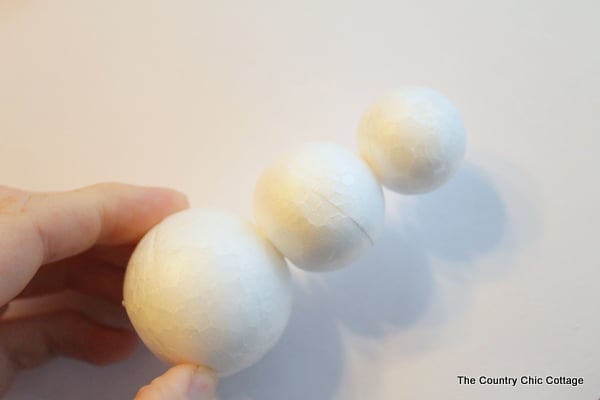
Step 1: Cut Off A Portion Of Your Foam Balls
Start with your foam balls and toothpicks. Cut off a small portion of the largest ball to give your snowman an easy way to stand.
Step 2: Place Foam Balls Onto Toothpicks
Next, connect the foam balls on top of one another with toothpicks. Cut off your toothpicks if they are too long.
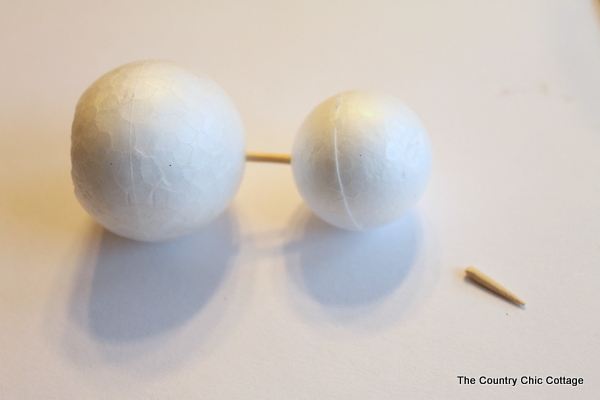
Step 3: Glue Foam Balls Together
Add a drop of hot glue between the foam balls before pushing them together. Now you have a snowman shape, but he looks a little plain.
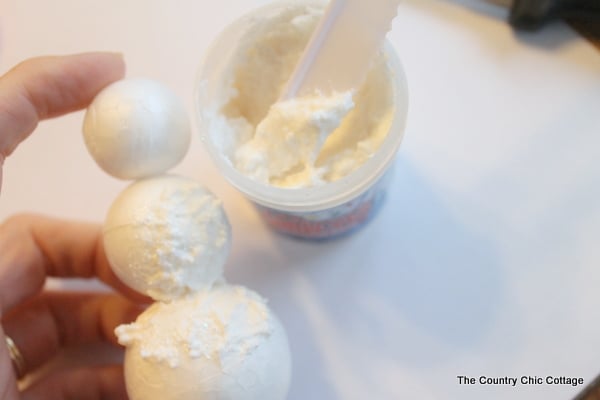
Step 4: Add Snow-Tex To Foam Balls
Use the Glistening Snow-Tex and a plastic knife to give him some character. Apply a liberal coat then set it aside to dry for about a day depending on how thick your coat is.
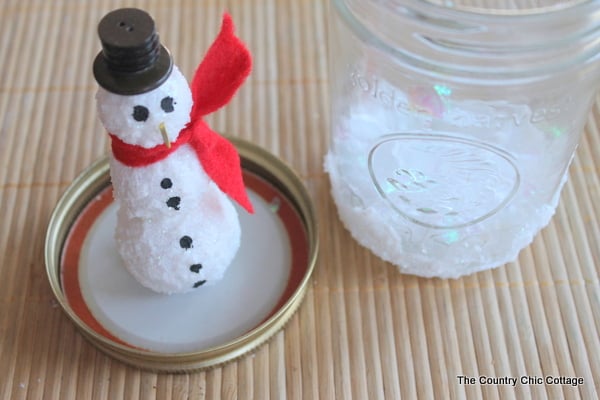
Step 5: Add Snow-Tex To Mason Jar
In the meantime, you can begin to work on your jar.
Add a liberal coat of the Glistening Snow-Tex to the top of your jar allowing it to “run” down the sides. I used my knife and gently spread it down the jar a little to create the “run” effect.
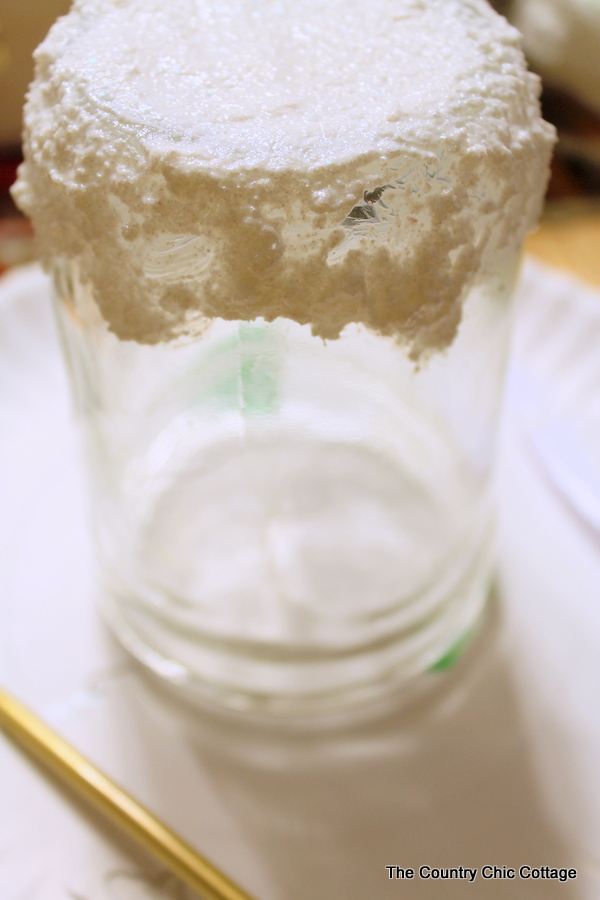
Again that will take about a day to dry. I went back with a second coat on top of that because I felt the snow globe needed it.
Step 6: Add Scarf & Snowman Details
Once your little snowman is dry you can begin to work on him some more.
Cut a strip of red felt and tie it around his neck. Use the handle end of your paintbrush to apply eyes and buttons.
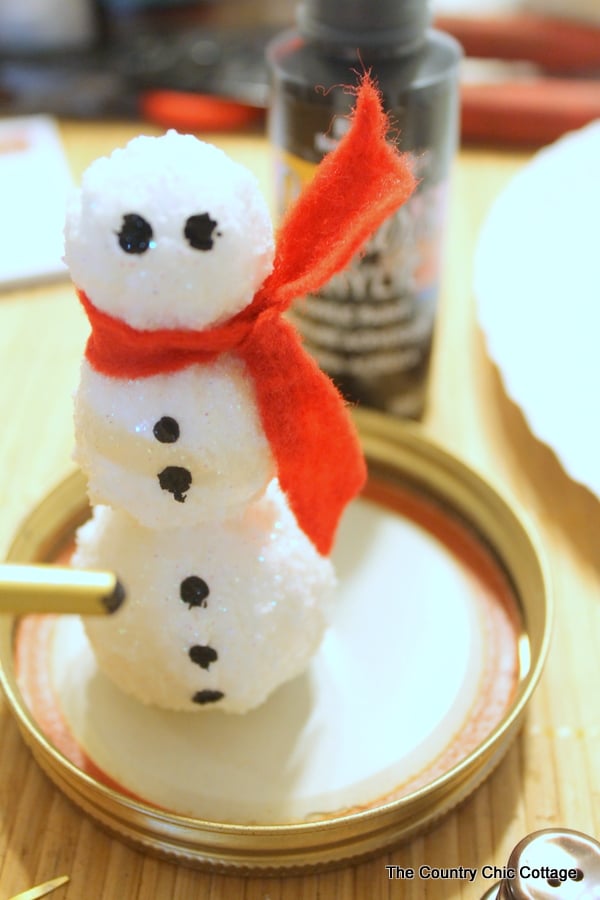
Step 7: Add Snowman Nose
Use one of the tines on the back of a yellow or orange brad to make a nose. Just pull it off and stick it into your foam. You could also use the pointy end of a toothpick if you dont have brads.
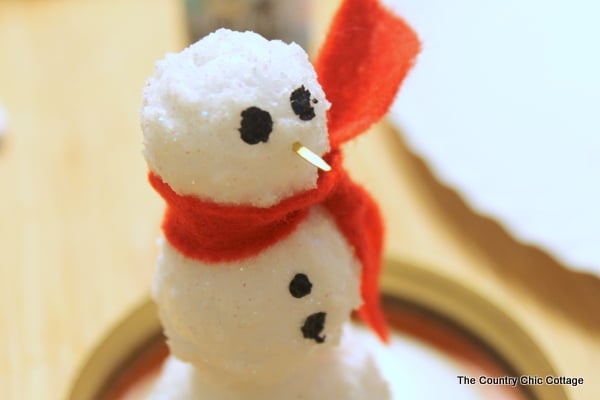
Step 8: Create Snowman Hat
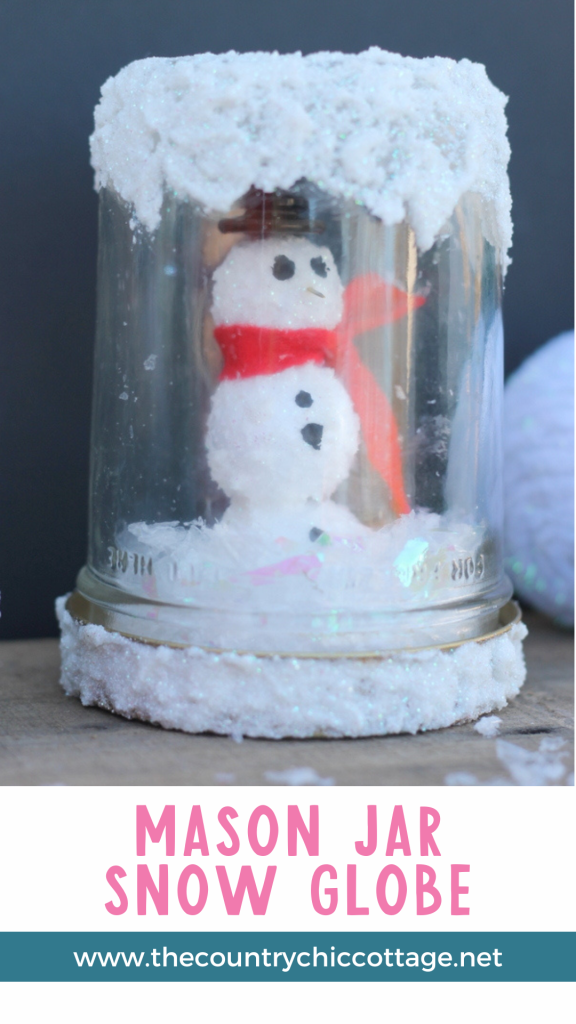
Stack buttons as shown below and hot glue those buttons together. Then hot glue it right on top of his head for a cute snowman hat.

Step 9: Glue Snowman To Mason Jar Lid
Use hot glue to secure your snowman to the lid and add some iridescent snowflakes inside the jar.
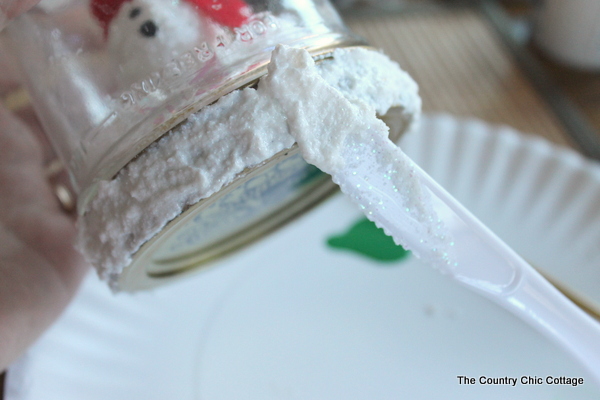
Step 10: Screw On Lid & Add Snow-Tex Around Rim
Carefully flip the lid into the jar and screw it on tightly. I thought the lid needed a little embellishment, so I added more Glistening Snow-Tex around it with a knife.
Allow everything to dry completely and you are ready to add this one to your winter decor display!
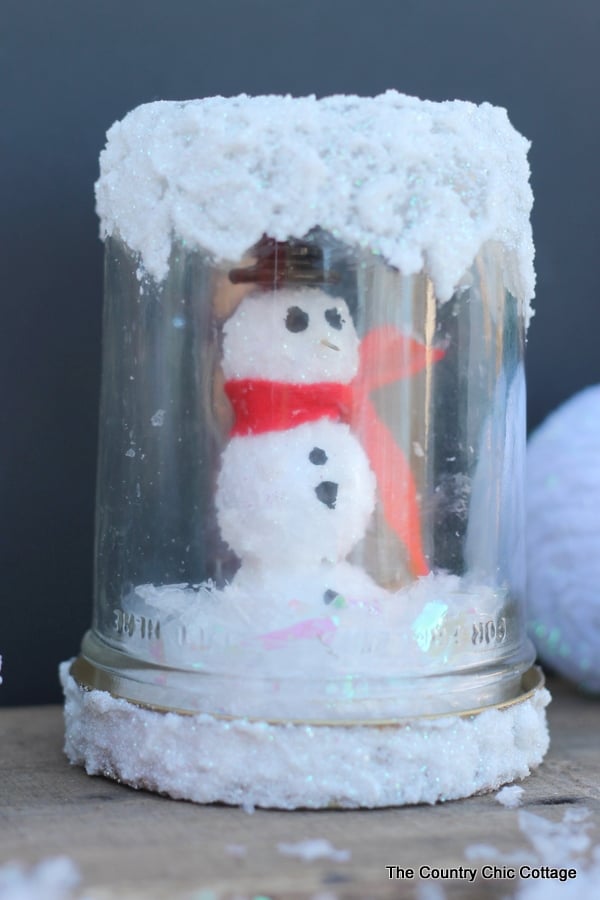
Your kids will love giving this one a shake and watching the snow fly around and fall down.
Consider making more than one DIY mason jar snow globes for your home! Or, if you have a little extra time, grab some extra supplies and make multiples because they make great DIY gifts!
FAQs About Mason Jar Snow Globe
Here are a few common questions that I often see readers asking about making mason jar snow globes. If you have a question, please check if I’ve already addressed it below. If you don’t see your question listed, please leave it in the comments!
What Types Of Jars Are Best For A Mason Jar Snow Globe?
You can use pint-size mason jars as I did. They work the best for this project because they’re large enough for the snowman to fit.
However, if you want to change up this snow globe craft and add variety, you can use mini cruets instead. Just be aware that you may need to make slight adjustments to the way you make your snowman (make it smaller) so it will fit inside.
What Can I Use For Snow Inside The Jar?
I used loose iridescent fake snow inside the jar instead of water or another liquid. Kids can still shake up the snow globe and watch the fake snowflakes swirl around.
However, if you want to explore other options, you could use glitter inside your snow globes. I think that could be even messier, but it would look amazing if you are up to the task of cleaning up glitter!
You could also cut up some cotton balls and add some snow glitter for a lovely effect.
Could I Add Arms To The Snowman?
You could, but I don’t recommend it. This is because you have to be able to fit the snowman into the jar. However, if you do add arms, make sure that they are not too long, so you can still fit your snowman inside your mason jar.
Can I Use Regular Snow-Tex For This Mason Jar Snow Globe?
Yes, you can! I like the look of the Glistening Snow-Text, but regular Snow-Tex will work just as well (it will just be less sparkly).
5 Holiday Decor Crafts
Did you love this mason jar snow globe and want more holiday decor crafts? Then check out the projects below!
- Felt Christmas Tree For Toddlers
- Happy Holly Days Christmas Banner with the Cricut
- DIY Rudolph Ornament
- Easy Santa Christmas Countdown for Kids!
- Cricut Christmas Signs with Layered Vinyl for the Holidays
A Year of Jar Crafts

Sign up for our email list to get a FREE book with an entire year of jar crafts! 12 months, 12 crafts, tons of fun!


