
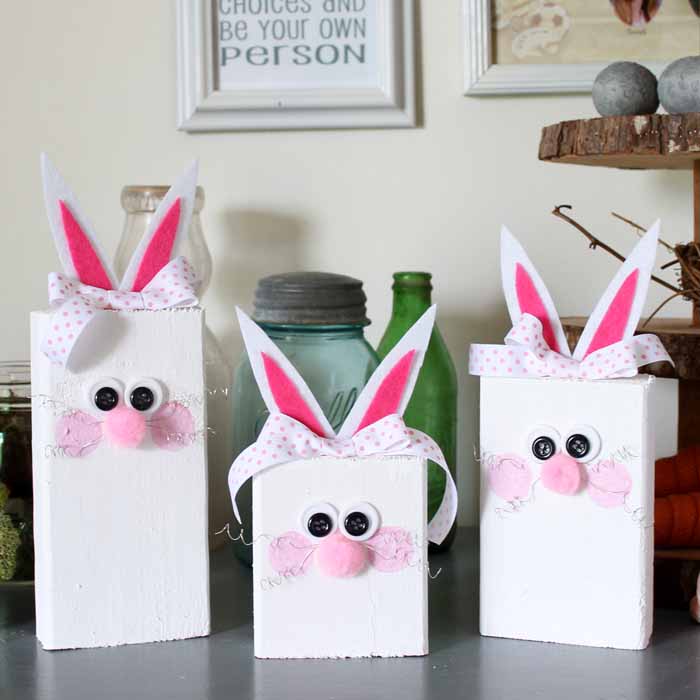
If you’re looking for ways to use up pieces of scrap wood, these DIY wooden bunnies may be the perfect idea! Easter wood crafts like these wooden Easter bunnies are fun and make adorable home decor pieces to place throughout your home!
DIY Wooden Bunnies Video Tutorial
The video below provides all of the instructions and demonstrates how to make this Easter wooden bunny project!
If you can’t watch the video or miss any of the steps, just follow along with the written instructions below.
How To Make DIY Wooden Bunnies
Spring is a wonderful time of year. The birds start singing, the flowers bloom, and the Easter Bunny comes for a visit!
And, as much as I like watching my yard come to life in the spring, I love bringing my home to life with fun and adorable Easter decor.
After you make your Easter eggs, Easter wreath, and table decorations for Easter Sunday, it’s time to add an Easter bunny or two to the rest of your decor.
Using some scrap wood, make some Easter bunny-style wooden bunnies to scatter throughout your home! This is an easy project that will look great in any home.
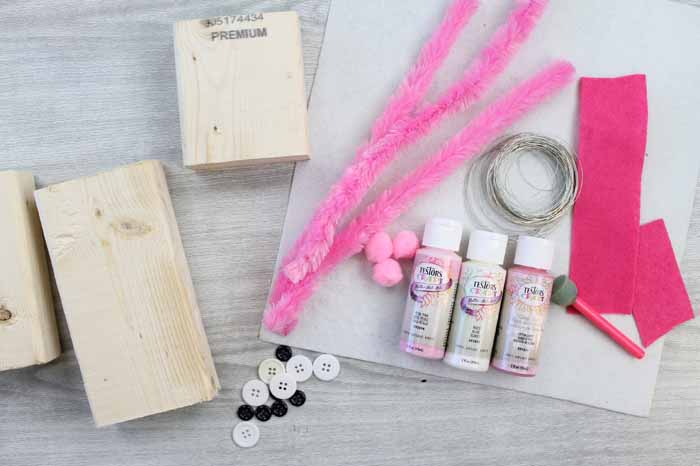
Supplies Needed To Make DIY Wooden Bunnies
This project was inspired by something I saw in my local craft store. Those wooden bunnies were made with 4×4 square blocks of wood. However, I didn’t want to buy wood just for this project. When I looked through my wood scraps, I only had 2x4s.
I hate wasting anything, so I’m always looking for ways to use scrap materials. For this wooden bunny project, I used scrap 2×4 ends.
- Scrap 2×4 pieces (any length)
- Craft paint (in white, light pink, and pink glitter colors)
- Paintbrush
- Sponge pouncer brush
- Pink pompoms
- Silver colored wire
- Dowel (or pencil)
- Stiff felt (pink and white)
- Ribbon
- Buttons (white and black)
- Large pink pipe cleaners
- Hot glue and glue gun
NOTE: I cut out my bunny ears by hand for this project, but you can use a Cricut machine instead. I talk more about using a Cricut machine to cut the bunny ears in step 4. If you would like to use your Cricut to create the bunny ears, you will need to add the following supplies to the list above.
Step 1: Paint Wood Blocks
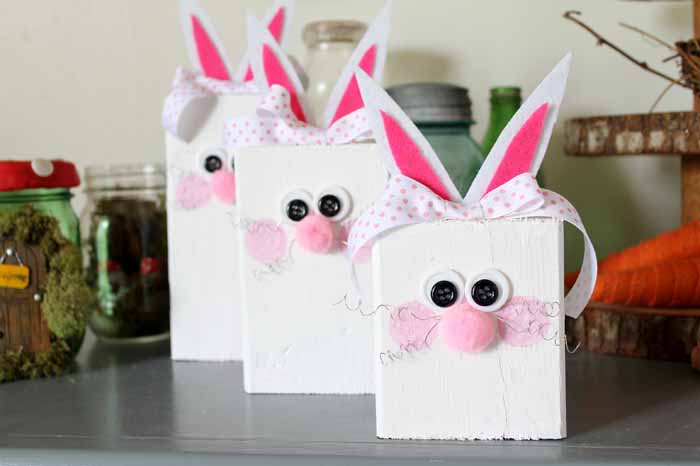
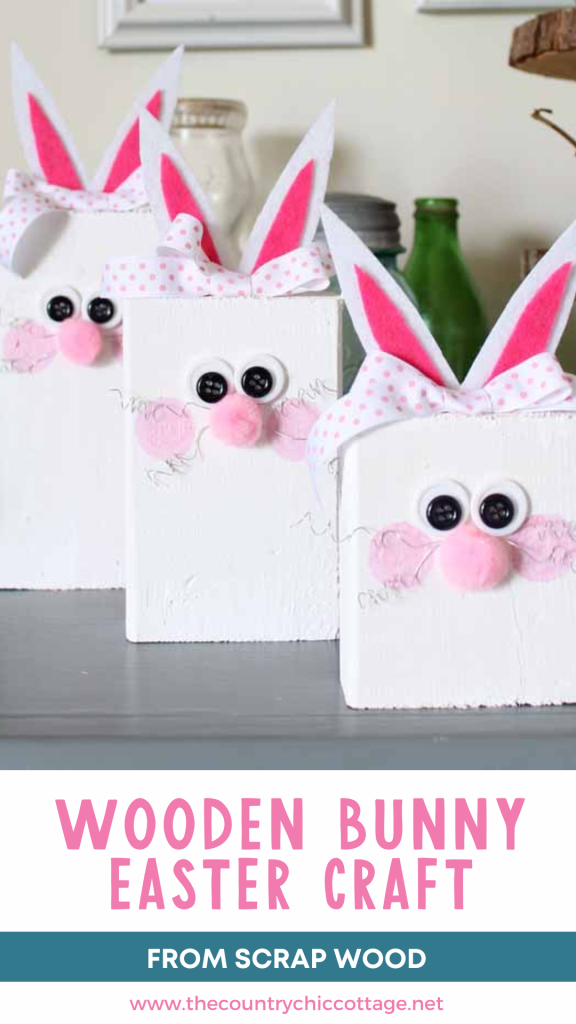
Paint the scrap wood blocks with the white Testors craft paint.
NOTE: This may require two coats for complete coverage. Allow them to dry completely in between coats.
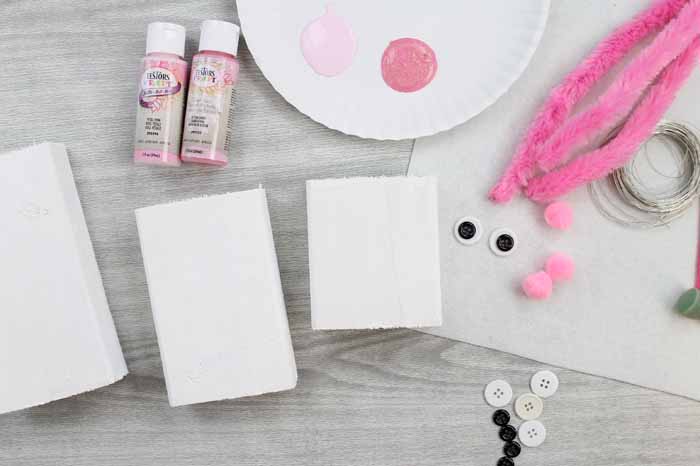
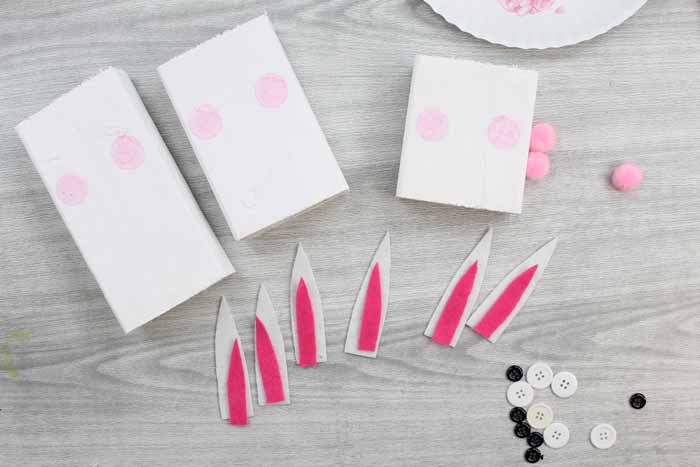
Step 2: Add Pink Cheeks
Next, add on pink cheeks with the sponge pouncer brush. I used the buttons and pompoms as placement holders to get an idea for location placement.
Step 3: Add Glitter
While the pink “cheeks” are still wet, add some pink glitter paint. Then, go over with the sponge brush while they’re still wet. Set them aside and allow them to dry.
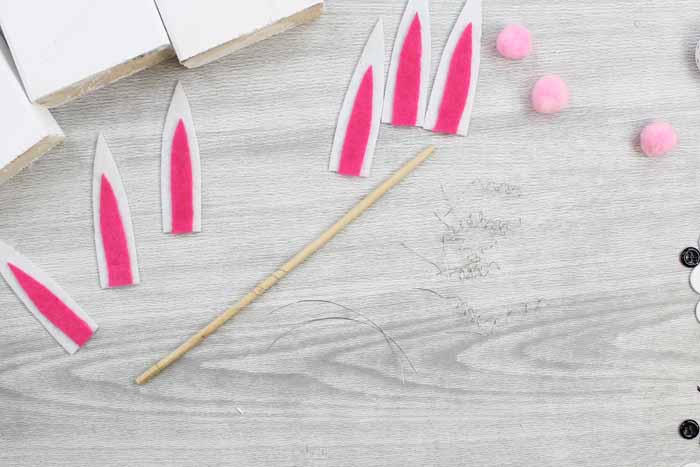
Step 4: Make Bunny Ears
While the cheeks are drying, you can start making your bunny ears. Cut out ear-like shapes from both the white and pink felt.
Layer the smaller pink felt pieces on top of the white felt ears and attach them with hot glue.
How To Make Felt Bunny Ears With A Cricut Machine
If you don’t want to cut your bunny ears by hand, use your Cricut machine instead!
To do that, find a bunny ear image in Cricut Design Space. Then, cut out the outside of the ear in white felt and the inside of the ear in pink felt.
To learn how to cut felt with your Cricut machine (and the correct blade to use), check out our Cutting Felt With A Cricut: A How-To Guide!
Step 5: Cut Silver Wire
Cut the silver wire into 3.5 to 4-inch pieces. Wrap around a dowel or pencil to create curls. You will need four curled pieces per bunny.
Step 6: Glue Bunny Ears To Wood Block
Cut the bottoms of the bunny ears at an angle, and use hot glue to secure them to the tops of your wood pieces.
Step 7: Glue Bow To Wood Block
Tie the ribbon into a bow and use hot glue to secure it into place in front of the ears.
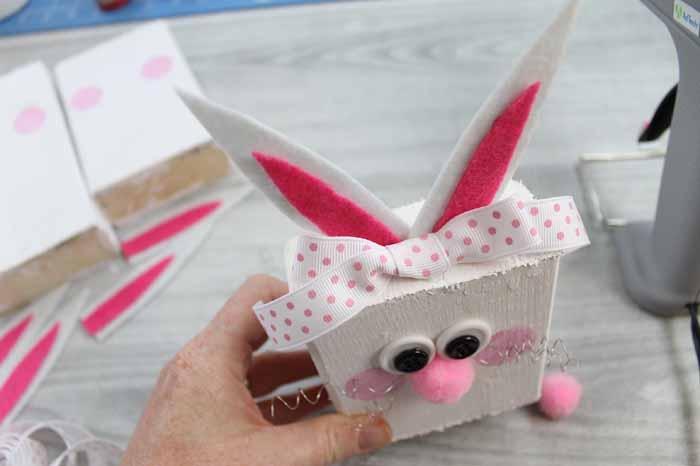
Step 8: Create Bunny Face
Let’s make the face. Start with some glue in the center and add on your wire whiskers. Stick the pink pompom into the glue while it is still hot to secure it on top of the ends of the wire pieces. Complete the face by adding the buttons stacked on each other for eyes.

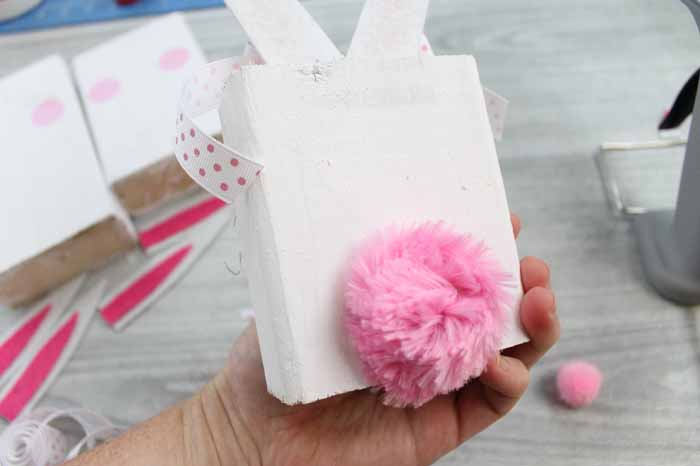
Step 9: Glue Bunny Tail To Wood Block
Then, to finish your bunny, curl the pink pipe cleaner into a circle and use hot glue to secure it to the back of your wood block.
Your Easter wooden bunny project is complete! Repeat the steps to make as many as you like.
These Easter bunnies are too cute and perfect for any home!
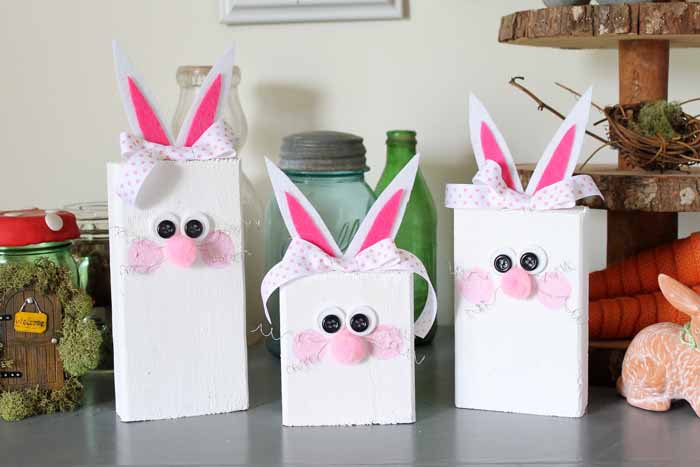
Turning scrap wood into something special is a great way to recycle (and they store well for next year).
I love decorating for spring, and when it is this easy to make, it is a no-brainer! Will you be making these DIY wooden bunnies for Easter?
FAQs About DIY Wooden Bunnies
Here are a few common questions that I often see readers asking about making these DIY wooden bunnies. If you have a question, please check if I’ve already addressed it below. If you don’t see your question listed, please leave it in the comments!
Can I Change The Size Of These DIY Wooden Bunnies?
Yes, you can! You can make these DIY wooden bunnies smaller or bigger depending on the look you are going for.
Can I Use A Different Kind Of Glue?
Hot glue is ideal for projects like this one because it dries quickly and holds securely. However, if you don’t have a hot glue gun, you could use super or craft glue.
Can I Use A Different Type Of Paint For These DIY Wooden Bunnies?
Yes, you can use craft paint. However, craft paints do not have as much pigment or a binder that is as high-quality. That means that if you use craft paint instead of acrylic paint, you’ll likely find that you need to paint more than two coats to cover the wood.
And, because it doesn’t bind as well, it may wear off faster.
Can I Paint These Bunnies A Different Color?
Absolutely! You can paint these bunnies grey, brown, or any color you like. However, the only thing you need to remember is that your felt ears will need to match the color of your bunny.
10 More Easter Crafts
If you love these DIY wooden bunnies, here are some other projects for Easter you won’t want to miss!
- Marbled Eggs On A Moss Easter Wreath
- Carrots for the Easter Bunny Plate with the Cricut
- Twine Wrapped Easter Eggs
- Dollar Tree Easter Craft: Easy Carrot Wreath DIY
- Easter Jar Centerpiece from Recycled Pickle Jars
- Free Religious Easter SVG
- Burlap Table Runner for Easter
- Easy DIY Easter Bunny Treat Jars- Dollar Store Craft
- Easter Muddy Buddies: Bunny Bait Recipe
- Free Printable Easter Bunny Coloring Page


Oh my gosh Angie, too adorable, leave it to you to come up with these little critters. Do your bunnies have names? Wish could get Mr.Furry to cut these out for me, maybe next year. I did print this project out earlier today.
Having hard time typing let alone do any carpentry with this bum arm/shoulder.
Love every project you do even tho I don’t always make them all.
Have wonderful week
Thanks Jane! This one is perfect if you find him working on something else and there are some scraps!
These are just darling and I LOVE the addition of the big poofy pink tail in the back. Pinned.
Ahhhhhhhh love the faces Angie, those whiskers and glittery cheeks just do it for me. So adorable
OMG, so adorable! This will be a perfect mother-daughter craft for me and my girly this weekend. Bonus, Dad will be happy we get to use up some of his scrap wood. Thanks!
Adorable bunnies
These are adorable 🙂 I’ve been looking for Easter DIY ideas to work on with my toddler. Thank you for the inspiration!
http://www.thislifeisbelle.com/
Aww! I just love these!!
I would love for you to share this with my Facebook Group for recipes, crafts, tips, and tricks: https://www.facebook.com/groups/pluckyrecipescraftstips/
Thanks for joining Cooking and Crafting with J & J!
These bunnies are so cute and I will be featuring it in my Bunny Decorations for the Home on Sunday at the Merry Monday Party! Hope to see you at the party at 6 pm PST.